
All 14 Playrooms Office Item Locations
Track all 14 Playrooms items by area, with community-reported couch travel time, Hotel layout notes, and office decoration details.
Where are all 14 findable items in Playrooms?
The Playrooms all 14 found item locations checklist covers 14 objects spread across seven areas. Knowing which area holds each object helps you narrow your search, especially when you are missing just one piece. This Playrooms all 14 found item locations guide brings together every item named in the reviewed community report, along with the useful notes about the distant couch, changing Hotel layout, and interactive decorations.
The area list below has been checked against the original guide’s screenshots. The pictures provide landmarks and the Hotel doors 016 and 569. These are observations of the creator’s full-release run, not a guarantee that every later patch preserves the arrangement. No unsupported key prices or unlock sequence are added.

Playrooms - Episode 1 - Full Game Release! — FalconPlaysGamesOfficial
Video source: Playrooms - Episode 1 - Full Game Release! — FalconPlaysGamesOfficial.
General full-release gameplay reference. This is not a dedicated tutorial, device test, or proof of this article’s particular mechanic. Exact patch is not identified.
The item names, numbering, and area assignments below come from community reports in the Steam Community Item Locations guide. They are player documentation, rather than an official developer checklist.
| Area | Listed item numbers | Items in that area |
|---|---|---|
| Playroom | #1 | 1 |
| Waiting Area | #2–#3 | 2 |
| Backroom | #4–#5 | 2 |
| Poolroom | #6–#7 | 2 |
| School | #8–#9 | 2 |
| Hotel | #10–#11 | 2 |
| Office | #12–#14 | 3 |
| Total | #1–#14 | 14 |
This guide concerns Playrooms by Two Pixels UG, whose Windows Steam full release launched on November 4, 2026, according to the reviewed official Playrooms Steam listing. The checklist reflects the material reviewed for November 6, 2026; it does not establish that the total will remain unchanged after future updates.
Playroom, Waiting Area, and Backroom items
These three areas account for the first five entries in the Playrooms all 14 found item locations checklist. Preserve the item names when comparing your collection with the table: the source distinguishes individual furniture pieces, even when several belong to the same general category.
| Item number | Item name | Reported area | Additional community detail |
|---|---|---|---|
| #1 | Toy Block | Playroom | The only item listed for this area |
| #2 | Bookshelf | Waiting Area | Listed alongside the Gramophone |
| #3 | Gramophone | Waiting Area | Plays music after placement in the office |
| #4 | Coffee Table | Backroom | Listed alongside the Three Seat Couch |
| #5 | Three Seat Couch | Backroom | A round trip reportedly takes about three minutes with maximum stamina and the coffee boost |
Playroom: Toy Block
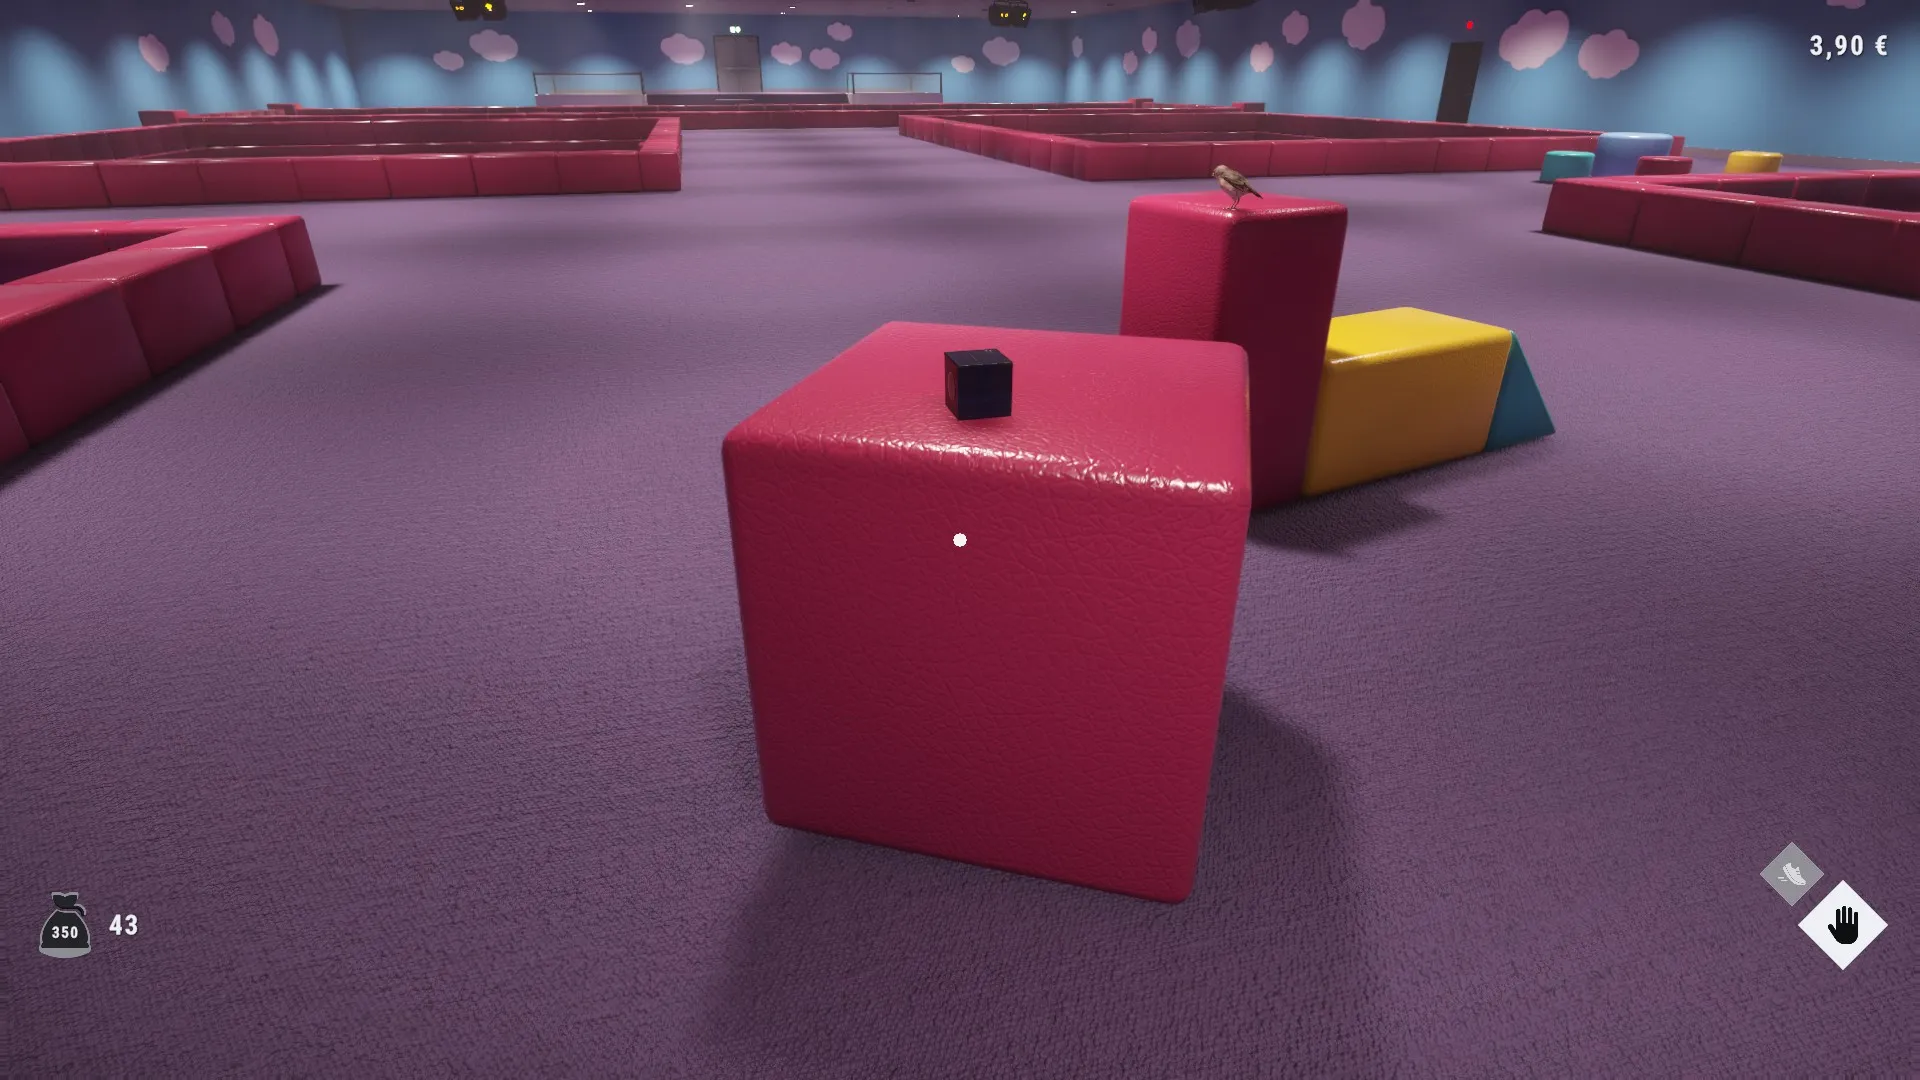
The screenshot shows a small dark cube on the large red foam block in the Playroom, beside a taller red block and yellow-and-blue shapes. Examine the small cube rather than the large furniture underneath it. The following picture identifies it as Toy Block and displays the take prompt.
Waiting Area: Bookshelf and Gramophone
The Gramophone has a documented function after it is placed in your office: it plays music, and community reports say you can switch it off. That makes it one of the few objects in the source with a described interaction beyond its location. The guide’s pictures show the bookshelf at a Waiting Area corridor junction. The gramophone stands on a small table in a separate green room reached from that area. This is the small collectible room, not proof that you have reached the Green Office labyrinth. Its music-toggle control is not identified in the guide.
Backroom: Coffee Table and Three Seat Couch
One player experience estimate puts the run to the couch and back at approximately three minutes with maximum stamina plus the coffee boost. That figure describes a round trip under those conditions. It does not establish an exact time for every player or make either boost a confirmed collection requirement.
The pictures show the Coffee Table against a yellow wall beneath a clock, and the Three Seat Couch at the far end of a long yellow corridor. These landmarks distinguish the two targets. Allow for the reported couch travel time when planning a search. The official description says lights begin shutting down when the shift ends and emphasizes staying in the light. It does not provide a couch-specific safe departure time.
Poolroom and School items
The next four entries in the Playrooms all 14 found item locations checklist divide evenly between Poolroom and School. Community reports assign two objects to each, bringing the running checklist total to nine before the Hotel and Office entries.
| Item number | Item name | Reported area |
|---|---|---|
| #6 | Telescope | Poolroom |
| #7 | Armchair | Poolroom |
| #8 | Wall Clock | School |
| #9 | Copper Icosahedron | School |
Poolroom: Telescope and Armchair
Look to the Poolroom entry when your missing object is the Telescope or Armchair. Both are assigned to this area in the community source. The illustrated Telescope route goes underwater to an opening beside a column, then into a small enclosed space containing the telescope. The Armchair sits on the raised Poolroom walkway beside the railing. These are screenshot landmarks, not a claim about the upgrades required to reach them.
School: Wall Clock and Copper Icosahedron
The School’s two listed objects are the Wall Clock and Copper Icosahedron. The screenshots locate the Wall Clock above the stairwell landing and show the Copper Icosahedron inside an open red locker. The following examination image names the object, distinguishing it from the Hotel sculpture. The guide does not establish a numbered locker or an upgrade requirement.
Hotel items and the changing room layout
The Hotel requires an extra qualification in the Playrooms all 14 found item locations checklist. Community reports say its rooms change position each day, and the original guide points readers toward the room numbers shown in its pictures.
The original pictures have now been checked: room 016 is shown before the Television pickup, and room 569 before the Abstract Sculpture pickup. The first doorway is crowded with suitcases; the second shows a large sculpture beside the bed. Use those numbered doors and visual landmarks together.
| Item number | Item name | Reported area | Supported location or function note |
|---|---|---|---|
| #10 | Television | Hotel | Room 016 in the guide; suitcase-filled doorway; several channels after office placement |
| #11 | Abstract Sculpture | Hotel | Room 569 in the guide; sculpture on a pedestal beside the bed |
Use room identity when consulting the illustrated guide
The community guide’s advice is to use the pictured room numbers because the Hotel rearranges its rooms. Its wording suggests the items should remain associated with those numbered rooms, but that is a community expectation, not a developer guarantee established by the reviewed material.
The photographed door numbers are more useful than a fixed left-or-right hallway route. Check the original guide alongside this checklist if the layout differs from your visit. A room number in a player screenshot documents that run; it does not prove that a later patch cannot alter a collectible.
Television functionality
Community reports describe the Television as interactive once it has been moved into the office, with several channels available to watch. The source does not name those channels, state an exact channel count, or explain the switching controls.
Office items and tracking your remaining finds
The final three entries in the Playrooms all 14 found item locations checklist belong to the Office. This is the largest area group in the reviewed list, with three objects compared with one or two in each other area.
| Item number | Item name | Reported area |
|---|---|---|
| #12 | Feeding Bowl | Office |
| #13 | Desk Plant | Office |
| #14 | Tall Plant | Office |
The Feeding Bowl, Desk Plant, and Tall Plant are all separate entries. The pictures show the bowl on the floor beside blue waiting chairs, the small plant on an Office cubicle desk, and the tall plant beside a broom in a narrow side room. Keep both plants on your checklist: recording only “plant found” leaves it unclear whether you have accounted for one or both.
Compare names before repeating a search
Use the Playrooms all 14 found item locations tables to organize your own record:
- Write down the exact names of the objects you have found.
- Match each remaining name to its reported area.
- Keep paired entries separate, including both plants and both Backroom furniture pieces.
- Treat the couch’s travel estimate and the Hotel’s rearrangement note as specific planning considerations.
Access to further areas also sits within the game’s broader progression. The official storefront describes collected balls as currency, full ball pits as a way to unlock abilities, and keys as the means of reaching the next area. It also lists purchasable equipment such as a scoop and flashlight.
The reviewed sources do not connect particular furniture items to specific ability requirements or key prices. If an area is still inaccessible, this checklist identifies what is reported there without establishing the exact cost or steps needed to reach it.
Related guides
- Collectibles directory
- All 20 Playrooms Sparrow Locations by Area
- Playrooms Achievements and Unlock Requirements
FAQ
Does the Playrooms all 14 found item locations checklist give exact pickup spots?
It gives all 14 names and areas, with landmarks checked against the original screenshots. The Hotel pictures identify doors 016 and 569; other examples include the red foam block, underwater Telescope opening, stairwell clock, and open red locker. The guide does not establish a universal turn-by-turn route or every access prerequisite.
Do you need maximum stamina and coffee to collect the Three Seat Couch?
That requirement is not established. The community source reports an approximately three-minute round trip with maximum stamina and the coffee boost. It is a player travel estimate under specified conditions, not evidence that the couch is locked behind either upgrade or that another setup cannot reach it.
Do Hotel item locations change every day?
Community reports say the Hotel’s rooms move around each day. The guide suggests using the room numbers shown in its pictures to locate the items. The screenshots identify the Television with room 016 and the Abstract Sculpture with room 569. The reviewed evidence does not prove that the items themselves change numbered rooms or that these locations are guaranteed across later patches.
Which found items have confirmed office interactions?
The reviewed community report describes two: the Gramophone plays music and can be turned off, while the Television offers several channels after being moved into the office. No additional interactions are described for the other 12 entries. That limits what this guide can confirm; it does not establish that every other object lacks a function.
Related Articles
achievements
Playrooms Achievements and Unlock Requirements
Track Playrooms achievements with 12 visible requirements, collectible checklists, color-sorting advice, and clear limits on hidden unlocks.
achievements
Where to Find Lexi in the Playrooms Office
Find the reported Office elevator location for Lexi in Playrooms, plus what remains unverified about the rescue interaction, requirements, and rewards.
achievements
Playrooms Out of Water Achievement and Whale Location
Find the reported whale location for Playrooms' Out of Water achievement, with Green Office entrance directions, desk passage tips, and route limitations.
Was this helpful?
Thanks for the feedback!